Custom URL in Struts2 for each User
In this tutorial we will see how to assign custom URL for each user logged in Struts2. For example like ‘www.gmail.com/rajesh’ for user rajesh and ‘www.gmail.com/kumar’ for user kumar.
I assume that you already have a basic knowledge over struts 2 framework setup and simple Struts2 application. If you are not familiar please refer Struts2 Introduction and HelloWorld application.
To create custom URL for each user first we have to set the below constants in the struts.xml.
<constant name="struts.action.extension" value=",,action" />
<constant name="struts.mapper.alwaysSelectFullNamespace" value="false" />
<constant name="struts.enable.SlashesInActionNames" value="true" />
<constant name="struts.patternMatcher" value="regex" />
The first constant struts.action.extension is to disable the default .action extension from the URL pattern. The next two constants struts.mapper.alwaysSelectFullNamespace and struts.enable.SlashesInActionNames for transfering the parameter from the URL. The last one struts.patternMatcher is to use regular expression in the action names (For example <action name=”Lost*do”>).
Next is we have to map the request to an action. To do this create an action like below in struts.xml.
<action name="{username}" class="com.rajesh.struts2.CustomURL" method="customUrl">
    <result name="success">welcome.jsp</result>
</action>
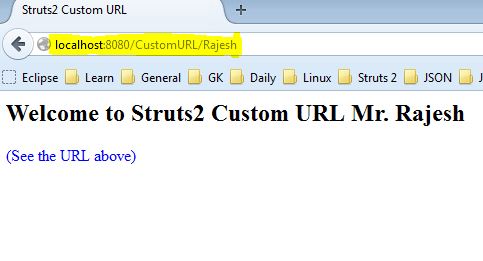
In the above code we mapped the string whichever comes next to the application context to the field username. For example if the request is http://localhost:8080/CustomURL/rajesh the framework will assign the value ‘rajesh’ to username field and then will proceed like normal struts2 flow. But one important thing is it will not accept slash in that. For example if the request is http://localhost:8080/CustomURL/test/rajesh the framework will not call the above action. Because the request is for inside a package test. See the finalized code of struts.xml below.
struts.xml
<?xml version="1.0" encoding="UTF-8" ?>
<!DOCTYPE struts PUBLIC
"-//Apache Software Foundation//DTD Struts Configuration 2.0//EN"
"http://struts.apache.org/dtds/struts-2.0.dtd">
<struts>
    <constant name="struts.action.extension" value=",,action" />
    <constant name="struts.mapper.alwaysSelectFullNamespace" value="false" />
    <constant name="struts.enable.SlashesInActionNames" value="true" />
    <constant name="struts.patternMatcher" value="regex" />

    <package name="default" namespace="/" extends="struts-default">

        <action name="">
            <result name="success">home.jsp</result>
        </action>

        <action name="{username}" class="com.rajesh.struts2.CustomURL" method="customUrl">
            <result name="success">welcome.jsp</result>
        </action>

    </package>
</struts>
In the above code we added one more action with empty name “”. It is for the index page. So when we type simply the url http://localhost:8080/CustomURL the home.jsp will be displayed. See our home.jsp below.See our welcome.jsp below.
welcome.jsp
<html>
<head>
<title>Struts 2 Custom URL</title>
<script src="jquery-1.11.1.min.js"></script>
<script>
function myFunction() {
window.location.href = $("#username").val();
}
</script>
</head>
<body>
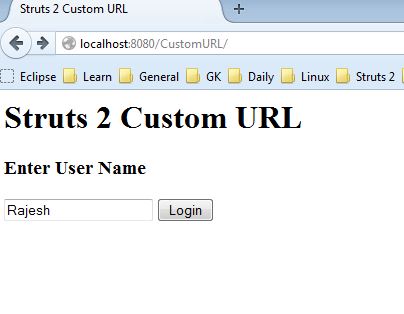
<h1>Struts 2 Custom URL</h1>
<h3>Enter User Name</h3>
<input type="text" id="username" />
<input type="submit" value="Login" onclick="myFunction()" />
</body>
</html>
See our action class CustomURL.java below
CustomURL.java
package com.rajesh.struts2;

import com.opensymphony.xwork2.ActionSupport;

public class CustomURL extends ActionSupport {

    private static final long serialVersionUID = -4337790298641431230L;

    private String username;

    public String getUsername() {
        System.out.println("Inside Getter");
        return username;
    }

    public void setUsername(String username) {
        System.out.println("Inside Setter " + username);
        this.username = username;
    }

    public String customUrl() {
        return SUCCESS;
    }
}
That’s all. Simply place all the above codes in respective files and run.
For the above example I have created a complete .war file with source code. Download and just place under Apache web apps folder and run.
[wpdm_package id=’538′]
If you face any issues while execution please post in comments or send email to rajeshmepco@gmail.com
Thanks (y) Good job!